
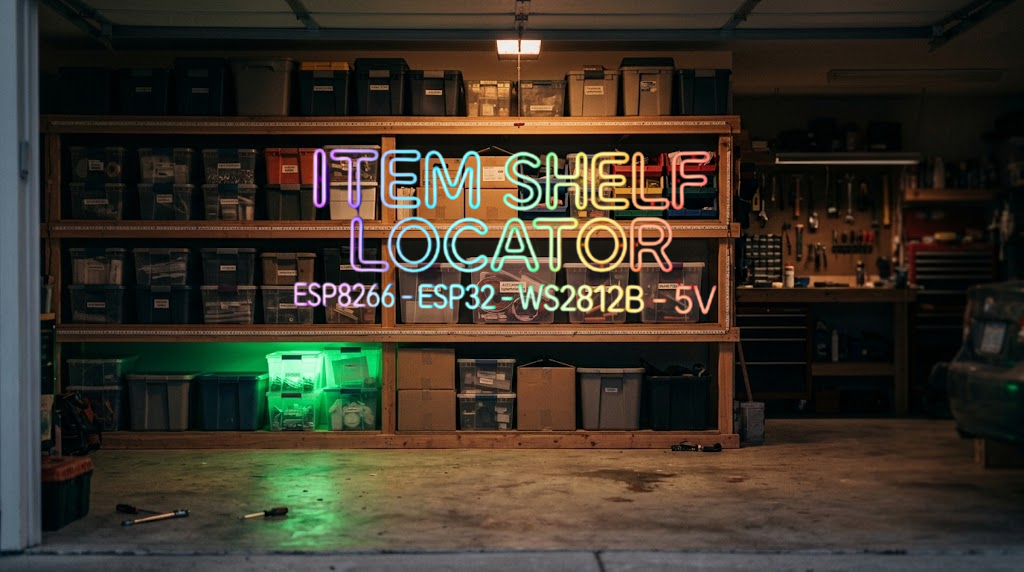
Find anything on your shelves by name. Put items in boxes, record where each box is, and when you search, the exact shelf and stretch of LED strip lights up so you can spot it from across the room – I created this project as a personal thing for myself. I have years of stored components, LED lighting, cables, don’t we all?!, and other general “one-day-it-may-be-useful” items, as well as setup USBs and so much more. They were all in boxes, piled against each other, creating a huge hindrance when I actually needed to locate anything, which usually resulted in me giving up and ordering it from Amazon for same-day delivery. This nonsense HAD to end! I want to be able to locate the items I need once in a blue moon without tearing the place apart, so “Item in a Box Locator” was born!
The idea actually came from a friend who wanted NFC tags on boxes so you could scan them and list the items inside. This could easily be implemented into this too, but I’m a big fan of visual indicators, and I’d much prefer the box to basically tell me where it is rather than scanning boxes, checking a database, then trying to find the numbered box. Who likes writing numbers on boxes anyway?!
Whilst men may marvel at “how cool is that?” and our inner geeks will get a little bit wet over the whole thing, it appears women are not quite as excited. When a female friend collected some old shelving recently, instead of the expected “oh, that’s cool and useful”, the reaction was more along the lines of “OMG, you are such a geek”.
So, with a nod to Kezza for the suggestion (and a big “up yours” to Jemma for the disproval), and a digital enhancement from myself, I bring you “Item in a Box Locator”, perhaps the most boring yet coolest name for a project to date…

🧠 How it works
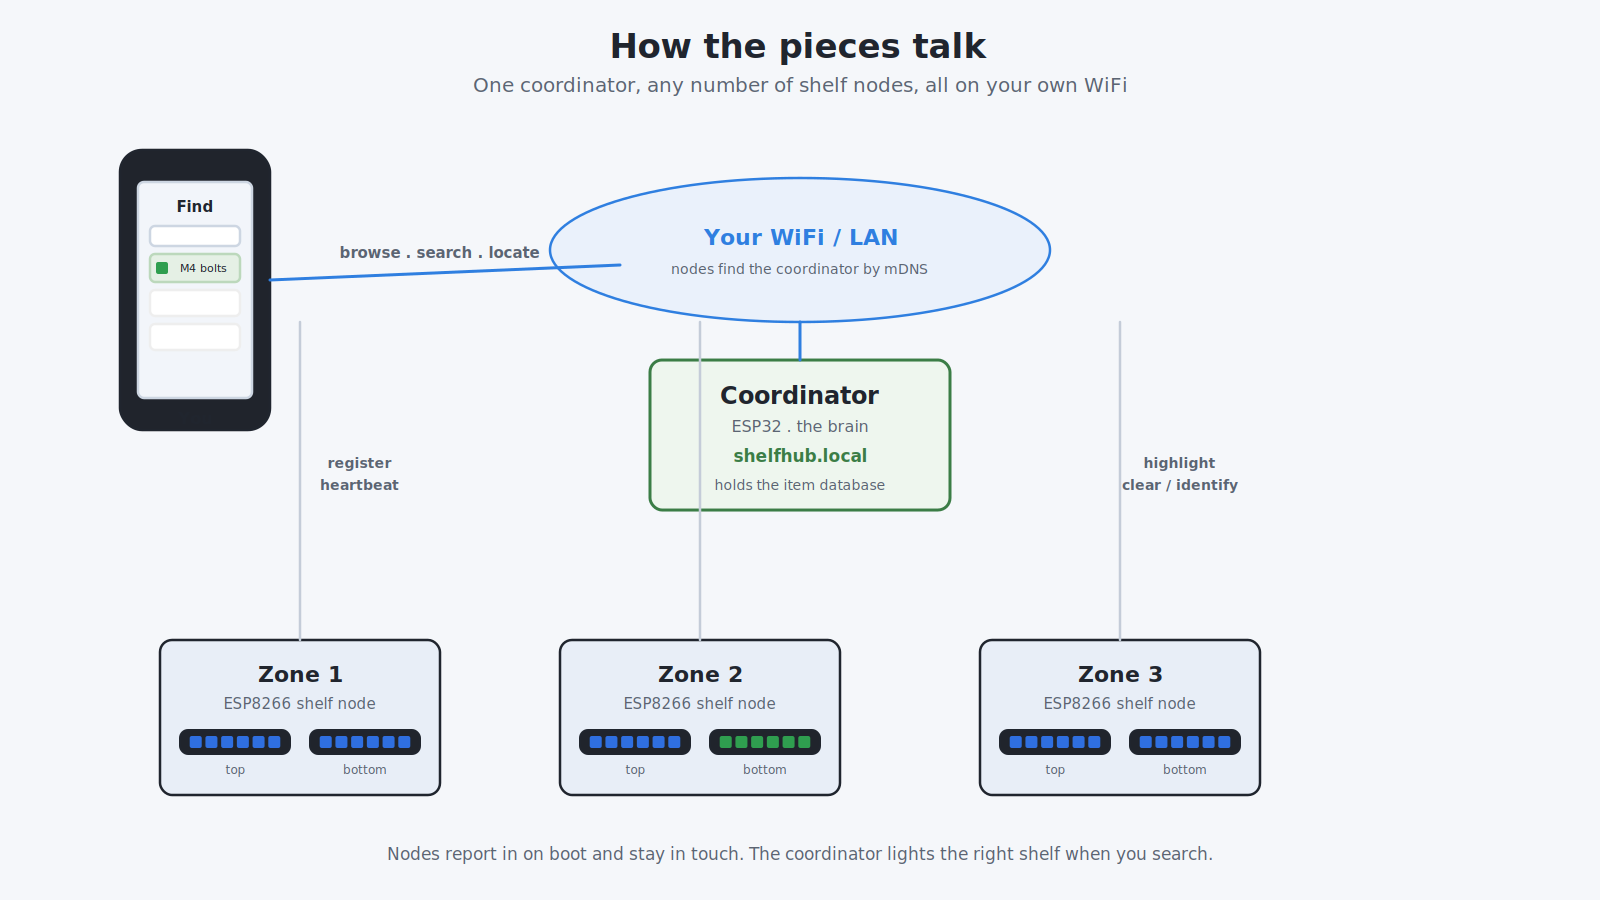
There are two parts. One coordinator (an ESP32) is the brain: it holds your whole item database and serves a web app. Any number of shelf nodes (an ESP8266 each) sit on your shelves and light up when told to. The nodes find the coordinator on your WiFi automatically, so there are no addresses to hunt down. You search in the web app, and it lights the right shelf.
🧰 What you need
| For each shelf node | For the coordinator |
|---|---|
| 🔌 A NodeMCU (ESP8266) board 💡 WS2812B LED strips (2 to 4 per shelf, your choice) ⚡ A 5V power supply for the strips |
🧠 Any ESP32 dev board Software 💻 The Arduino IDE 🧵 A USB lead per board |
ℹ️ This guide assumes you already have the ESP8266 and ESP32 boards installed in the Arduino IDE (through Boards Manager). If not, add them first, then come back here.
📚 Step 0. Install the libraries
In the Arduino IDE open Sketch > Include Library > Manage Libraries and install these two:
| Library | Used by | What it does |
|---|---|---|
| FastLED | Nodes | Drives the WS2812B strips |
| WiFiManager (by tzapu) | Nodes and coordinator | The first boot WiFi setup portal |
The coordinator only needs WiFiManager. Everything else it uses comes with the ESP32 core, so there is nothing else to add.
✅ Make sure WiFiManager is the one by tzapu, as there are similarly named libraries.
📂 Step 1. Open the sketches
Unzip the download. Inside the firmware folder are two sketches, each in its own folder:
- 🧠
firmware/shelf_coordinator/shelf_coordinator.inothe brain (ESP32) - 💡
firmware/shelf_node/shelf_node.inoa shelf node (ESP8266)
Double click a .ino file to open it in the Arduino IDE. Keep each sketch in its own folder, the IDE needs that.
⚡ Step 2. Flashing basics (the same every time)
You flash the coordinator once and each node once. The routine is always the same:
| 1️⃣ Plug it in | Connect the board with a USB lead. Use a proper data lead, not a charge only one. |
| 2️⃣ Pick the board | In Tools > Board choose ESP32 Dev Module for the coordinator, or NodeMCU 1.0 (ESP-12E) for a node. |
| 3️⃣ Pick the port | In Tools > Port choose the port that appeared when you plugged in. |
| 4️⃣ Upload | Press the Upload arrow and wait for Done uploading. |
⚠️ No port showing? The board needs its USB driver. Most use a CP2102 or CH340 chip. Install that driver, unplug and replug, and the port appears. If a board will not take the upload, hold its BOOT button while it starts, then release.
🧠 Step 3. Set up the coordinator (the brain)
Do this one first, so the nodes have something to report in to.
- Flash it. Open
shelf_coordinator.ino, pick your ESP32 board and port, and Upload. - Join its hotspot. On first boot it makes a WiFi network called
Shelf-Hub Setup. Join it. The password isconfigme123. - Point it at your WiFi. A setup page opens. Pick your home WiFi and enter the password. It saves, restarts, and joins your network.
- Open the app. On any device on the same WiFi, go to
http://shelfhub.local/. That is your control panel.
💡 If
shelfhub.localdoes not resolve on your network, find the coordinator’s IP address in your router and use that instead.
🔧 Step 4. Wire a shelf node
Each shelf node drives its own LED strips, one data pin per strip. You choose how many strips a node has, 2, 3 or 4, with a single line near the top of shelf_node.ino:
#define STRIP_COUNT 2 // 2, 3 or 4The data pins are fixed, so you just wire as many strips as your STRIP_COUNT. Two strips still behave as the classic top and bottom.
| Strip | Data pin |
|---|---|
| Strip 1 | D2 / GPIO4 |
| Strip 2 | D1 / GPIO5 |
| Strip 3 | D5 / GPIO14 |
| Strip 4 | D6 / GPIO12 |
2 strips (top and bottom)

3 strips

4 strips
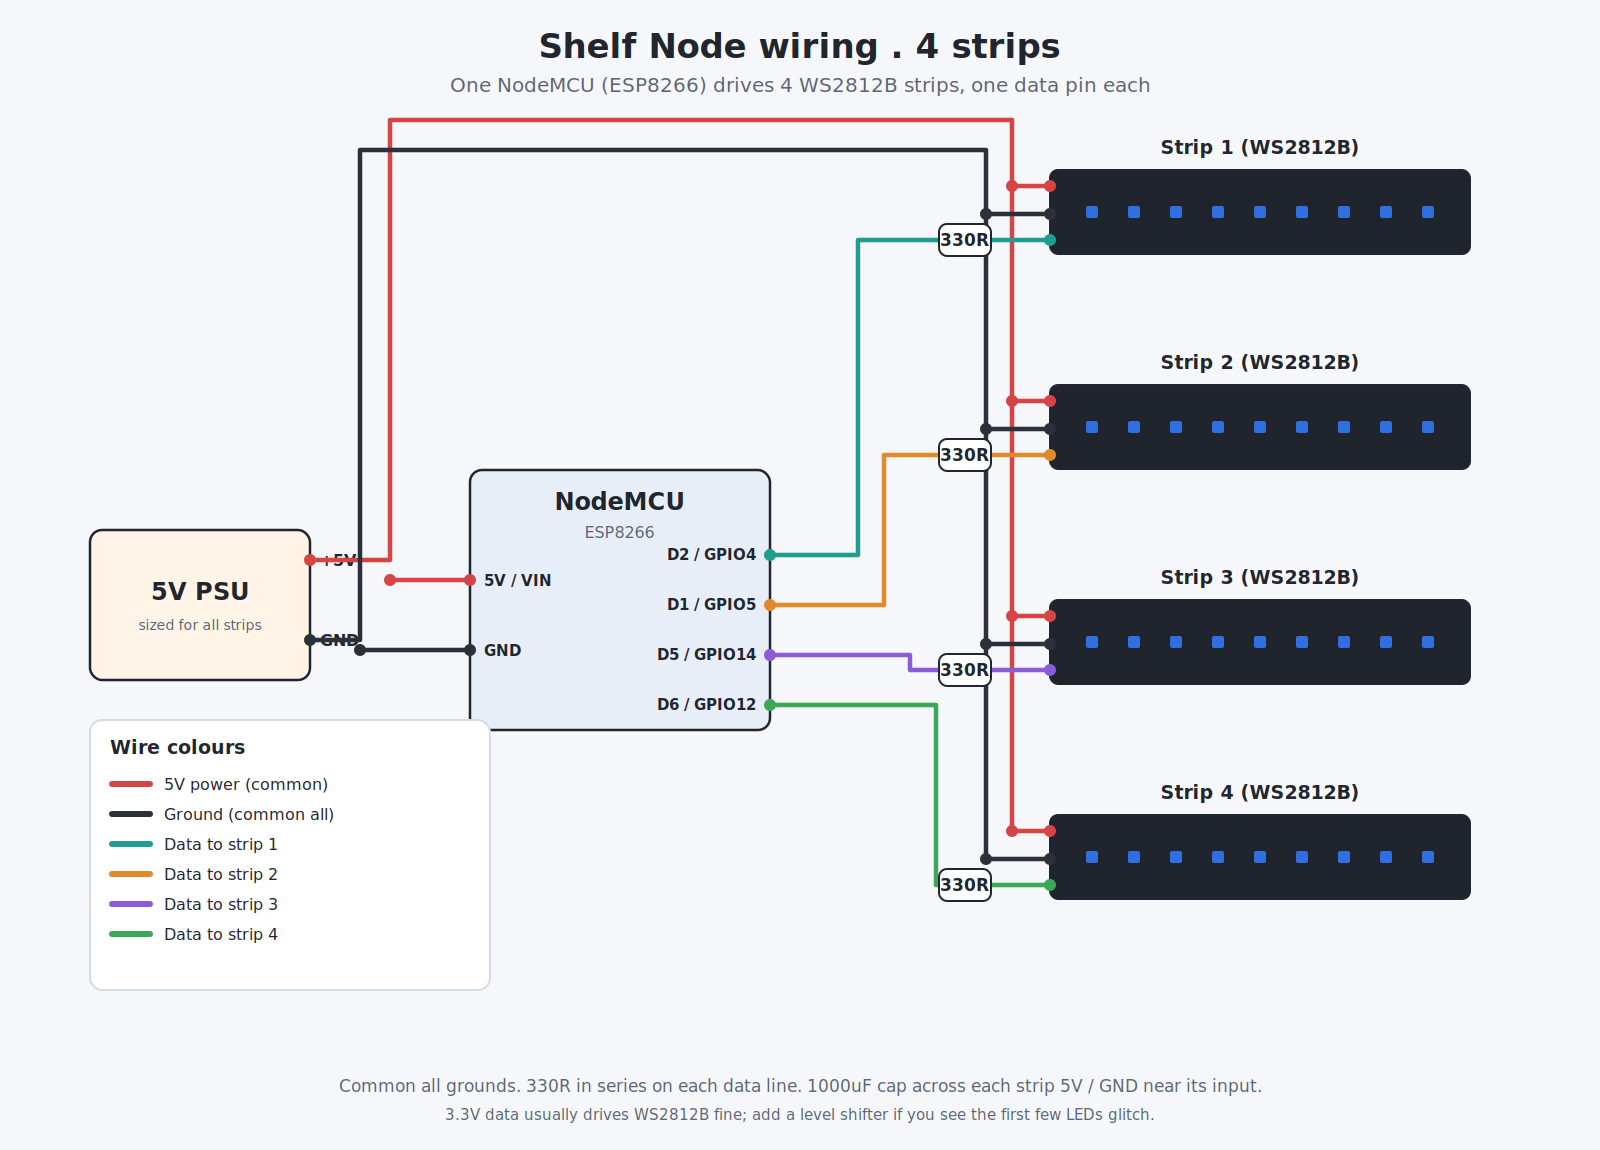
⚠️ Power the strips from the PSU, not the ESP. Join all grounds together (common ground). Put a 330 to 470 ohm resistor in series on each data line, and a 1000uF cap across each strip’s 5V and GND near where it starts.
🔁 This is the multi-strip firmware (coordinator v2.0.0, nodes v3.0.0). Flash both the coordinator and every node from this download so they speak the same protocol. An old 2-strip node still works, but strips 3 and 4 need the update.
📍 Step 5. Set up each node (zone)
Repeat this for every shelf.
- Flash the node. Open
shelf_node.ino, pick your NodeMCU (ESP8266) board and port, and Upload. - Join its hotspot. On first boot the node makes a WiFi network called
Shelf-Node. Join it (passwordconfigme123) and pick your home WiFi. - Coordinator address (optional). The setup page has a Coordinator address field. Leave it blank and the node finds the coordinator on its own. Only fill it in (with the coordinator’s IP) if you want to pin it.
- Name and order it. Back in
http://shelfhub.local/, open the Devices tab. The node appears. Press Identify to flash that shelf so you know which one it is, then name it and drag it into order. That is a zone.
➕ Add as many nodes as you like. Each one shows up in Devices as it reports in.
🔍 Step 6. Using it
Add stock
In the app, open Add stock. Pick a zone, choose the strip and the stretch of LEDs the box covers, then open the box and add items with quantities. Finish the box when done.
⚡ Quick Pack, the fast way to load lots of boxes
Filling a shelf from scratch? Do not sit there typing. Open http://shelfhub.local/pack on your phone and let Quick Pack do the fiddly bits. Pick a zone and strip once, set how many LEDs a box takes up, then for every box just tap New box. It grabs the next stretch of LEDs, lights them up so you can see exactly where the box goes, and gives you a box number to scribble on the box. Read the contents in, tap Finish, on to the next. No LED ranges to work out, no stopping to type.
Three ways to read items in, mix them as you like
| Method | How it works | Best for |
|---|---|---|
| 🎙️ Voice, read back | Tap Voice and say an item. The words appear in the box so you can check it heard you right, then tap Add to save it. Nothing is stored until you okay it. | Hands full, and you want to be sure before it saves |
| 🚀 Voice, auto add | Tick Auto add and it keeps listening, filing each item the moment you pause. Fully hands free. | Rattling through a run of items once you trust it |
| ⌨️ Type or paste | Type an item and press Enter, or paste a whole list into the bulk box, one item per line. | Somewhere quiet, or no internet for voice |
Two shortcuts that work whether you speak or type:
- 🔢 Quantities. Start with a number and it is saved as the count. Say or type three usb cables and it records 3 of them.
- ➗ Several in one go. Separate items with commas, masking tape, wire cutters, a box of m4 bolts, and each one is filed on its own.
📱 Voice uses your browser’s built in speech. It works on Android Chrome and needs the phone to be online. On an iPhone (Safari) the voice button is not supported, so use type or paste there instead. Either way the shelf still lights up so you know where the box goes.
✍️ Write the box number on the box. If you ever restore from a backup, that number ties the physical box straight back to its record.
Find something
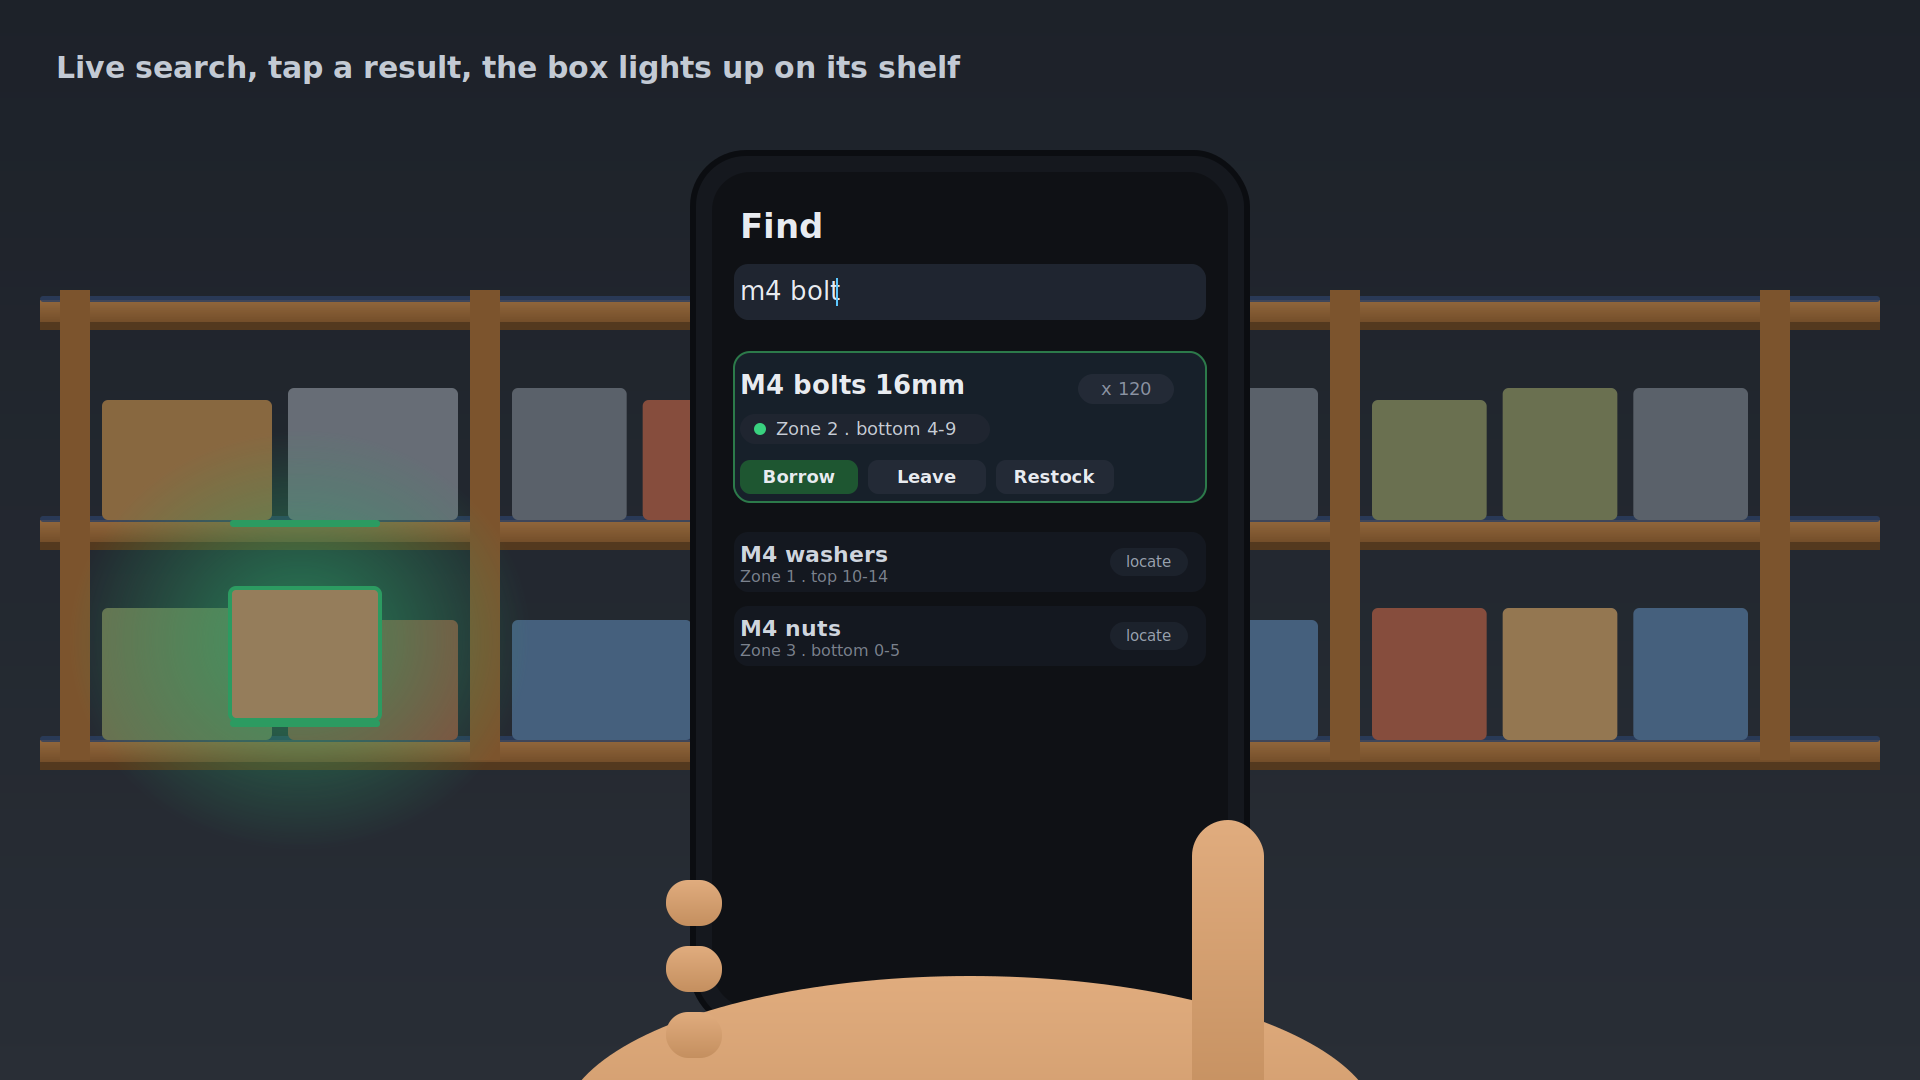
Open Find and start typing. Tap a result and its shelf lights up at the exact spot. Then choose:
- 🔄 Borrow, quantity stays the same, you are putting it back
- ➖ Leave, takes some away
- ➕ Restock, adds some
- 🗑️ Delete, removes the item
💾 Backup and restore
Your whole database is a single file on the coordinator. From Settings you can download a backup, and upload one to restore. If you prefer the command line:
curl http://shelfhub.local/api/export -o backup.dbThat is the lot. For the full list of endpoints, so you can script it or wire in your own node, see the API reference in the download.
🏠 Home Assistant integration
The Shelf Item Locator drops straight into Home Assistant, with no firmware changes and no ESPHome. Home Assistant simply talks to the coordinator over its normal HTTP API, so everything the web app can do, your automations and voice assistant can do too.
The package below gives you a Shelf Hub sensor (how many zones are online, plus your item counts), services to find an item by name, clear the lights, or flash a shelf, a search box for your dashboard, and optional voice control so you can say “find the M4 bolts” and watch the right box light up.
Save it as config/packages/shelf_locator.yaml, make sure packages are enabled in your configuration.yaml, and restart. If shelfhub.local does not resolve on your network, swap it for the coordinator’s IP address.


